Wednesday, October 2, 2019

Meanwhile.....

During these last posts you may have noticed some figures in various states of completion:

Slowly but surely I've been working on getting some of them done. Aaaaand I've finally completed some of them.

So without further delay....

The Red Knight


I've had this guy for several years and finally got around to getting him out. He also comes dismounted.

It's a great dynamic pose.

I also have a female half-orc from Reaper who may hopefully turn out to be a character in an upcoming adventure.


And another regular orc to add to the horde...


He turned out pretty good.

I wanted to do some tribal tattoos on this next guy but I was too scared I'd screw it up or it would just be too busy. So I left him plain. Supposed to be a mul for a Dark Sun campaign I never really got going. But maybe someday.


And finally a hobgoblin in samurai armor:


That's all for now. Thanks for stopping by.
Next time we'll see a "Tale of Two Planes"

Friday, August 30, 2019

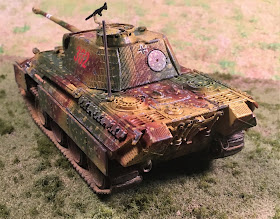
Practice Panther: the finished product

As promised, here are some pics of the Panther all finished.


So my justification for all this chipping and scratching is this is a survivor. The crew has been able to stay on the battlefield for month or two setting up and driving through dense woods, hence all the scratches from tree limbs and such.

In just about every reference picture I looked at there was at least one skirt panel missing so I had to cut one out.

And just for good measure I bent up the front fender a bit too.

Overall I'm very happy with it. I could have done a better job on the back exhaust but whose going to be looking at the back end anyway?
Most of the time we'll be seeing the business end.


This was a really fun build. I learned a lot in working through the techniques. I really liked how the airbrushing and chipping turned out. Apparently I'm better at that than I thought.

Thanks for stopping by. I plan on posting again soon so come back.


Monday, August 19, 2019

Practice Panther pt. 2


So I'm going freehand with my NEW AIRBRUSH!!! Did I say I really like it? It even has my name on it!

Got the previous failed attempt stripped off and a new base coat of yellow, time to add the green.


Add the red next. Also did a little splatter of green to get some green dots on the yellow.


Looking good!
Then I added the yellow spots using a brush.


Now I'm going to practice my chipping.

Apparently I skipped photos of adding decals. Straight on to chipping. I started with the light grey and it really looks like I over did it. Just bear with me, it will all work out.
After the light grey I went back over all those spots again with a darker grey and it really toned it down quite a bit:
This hatch came out great!!!!
Let me show you a couple of shots of the turret, and incidentally the scratch across the number is just two dimensional using paint. Looks like a real gash to me.

That's it for this post. I'll post pictures of the finished product next time.
Thanks for stopping by. Leave comments if you feel like it.


Wednesday, July 31, 2019

Practice Panther pt.1

On to the next thing.
Actually just another distraction to keep me away from other things.
Mini Me found these Italeri World of Tanks edition kits at the hobby shop. He got a Sherman and painted it up in a winter white wash. He wanted me to get one too, so I did. Twist my arm!!
Besides I have another project planned down the line and this would give me an opportunity to practice some things.
It's a pretty cool kit for 1/56. Not too much detail but it will work for me. The decals are all WOT themed and I think I'll save them for something else. I did like the way the tracks are in two pieces and all the wheels are one piece to make things simple.


I just put the wheels on with white glue so I could remove them later to get the tracks on. And, of course, the turret isn't glued to the hull so I still get the full rotation. The commander isn't glued in either. So next get it all primed and paint that commander.

Up to this point I was still thinking winter camo but then decided "what the heck...I'm gonna do AMBUSH!!!

So after watching a video for liquid masking I thought I would give it a shot.

Got my colors.....


Put the base coat on.....

I had this idea that I was going to liquid mask off the spots and all the yellow, go green, mask off all the green, go red, then peel off the mask. Let's see how that turned out.
Yellow


Green

 
Red


Peel off the mask....


That looks like crap. Time to strip it down and try something else. Hey! The reference page I had turns out to be the same scale as the model!!!

What if I just cut out the patterns on the picture to use as a mask? Well after cutting out the yellow and seeing how that was going to work (it wasn't going to) I scrapped the whole idea and let's do freehand!!!!

That's next in part 2.