
Time for the April blogpost:
AMAZON PHALANX

I originally saw these at vendor booth at a con a couple of years ago. I have a set of metal heavy armor amazons in the mountain of lead still waiting to be assembled and painted. But I saw these for a really reasonable price, even though they are plastic and just had to have them to add to an army.
So I waited a week and went into the vendor's shop and they were still there so I got 'em!
Open the box and look inside:

They didn't have any square bases so I had to get those extra.
(Same with the heavy phalanx - I need to remount them on square bases too)


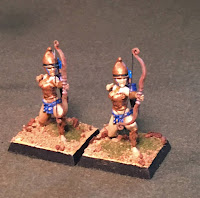
Got new skin tone paints to make this a very diverse group. We've got pale skin, fair skin, golden, bronze, tanned, and dark.


I had a select few that I had a plan for. I already decided on skin tone, hair color, helmet plumes, and an idea of matching or similar shield designs - a theme if you will. The rest were pretty random. That's what the tape on the sides of the bases are for...notes so I don't forget.
Next step after skin tone was the armor.


 And I added bow strings to the archers.
Helmets were next.
One thing I did discover in this was that the bronze skin is really really close to the bronze armor. Seems to make sense, after all bronze metallic is just bronze skin with metallic. DUH!

And we're ready for basing.
First I did the archers with the filled in bases.

Then I went ahead and did the rest without filling in the bases and that seemed to work just as well.
 Coarse sand, with short mm static grass and some fine foam flock.
 I ordered these from Warlord Games and they are really nice! I highly recommend these for any of your minis. Really cool!


No painting on the bases, just straight material in it's natural color.
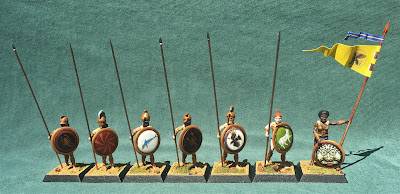
They came with pikes but the way I assembled them in my plan there just weren't enough. I think I was coming up two short. There were plenty of short spears, swords, and other weapons to use but I wanted all pikes in this unit.
 I ordered these from Warlord Games and they are really nice! I highly recommend these for any of your minis. Really cool!
I also ordered the shield transfers from Warlord.
These transfers were different from what I expected. They are transparent stickers as opposed to decals or water transfers. It was recommended to paint the shields white, then apply the transfers. This did work really well and the colors are very vibrant. I did have a few where I left the shields bronze and I think they turned out looking good too! What do you think?
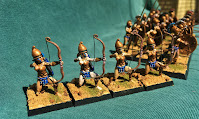
Here's the finished unit.

First, second, and fourth are on bronze shields while third, fourth, fifth, and sixth, are on white shields.


Well that's it. Actually my March project.
I did a few other things in between and since that I'll get to show soon on another post.
Thanks for stopping by.
And leave some comments if you like.
