Chuck

Chuck

Sunday, January 26, 2014

The project: 213th Squadron - the kit

The kit I'm using for this build is the 1/72 Spad XIII airplain [sic] kit from Academy.
I was able to pick up six for about $6 plus almost nothing shipping - the main reason for choosing this kit. I'm building a flight of four planes in this project which gave me two extra so mini-me and I put together two of them already. We did it in an afternoon and painted them up freestyle. Mini-me's has already taken a lot of battle damage flying around the house but here are a couple of pictures of mine:

 I had some lozenge decals and a new "magic blue" paint I wanted to use so I painted up a captured Spad.
 ...and the underside...

I didn't put any rigging on this one but I plan to in the current project. More about that in a later post.


It was a pretty quick build as you can see; only 5 steps in the directions.
 In doing my research I found someone else also had the same idea. You can see his work at http://uamf.org.uk/viewtopic.php?f=19&t=5567 and yes it's a "dog" of a kit but hey, a buck a model? Can't beat that. And I've already said I'm not trying to build a museum piece here or anything. I just want to try a flight build and give rigging a shot. I don't think I'll use human hair though. Or animal hair for that matter either.

There is quite a bit of cleanup to do on these pieces as you can see. Especially troubling was the elevators; I was going to have to carve out a little spot of the scalloped wing.

BEFORE


AFTER
Didn't turn out too bad.


I was also worried about cleaning up the exhaust pipes since they are so tiny and thin but I was able to make it all the way to the last pair before I broke one. But I got it back together and once painted you won't be able to tell. I started test fitting pieces and I could see there was going to be more modification and cleanup as I go.


So here I am so far:

 Next I'm going to be working on rigging the struts and filling in some holes near the exhaust connections, hiding seams, and those little mold spots on the wings.


Thanks for reading and please leave some comments.


Saturday, January 18, 2014

The project: 213th squadron, 3rd pursuit group AES

This is the project I wanted to start a blog for. I had seen someone else's blog (sorry, I forget who) on building a flight of German historical planes, and I was inspired.

I found an interesting book at the library 
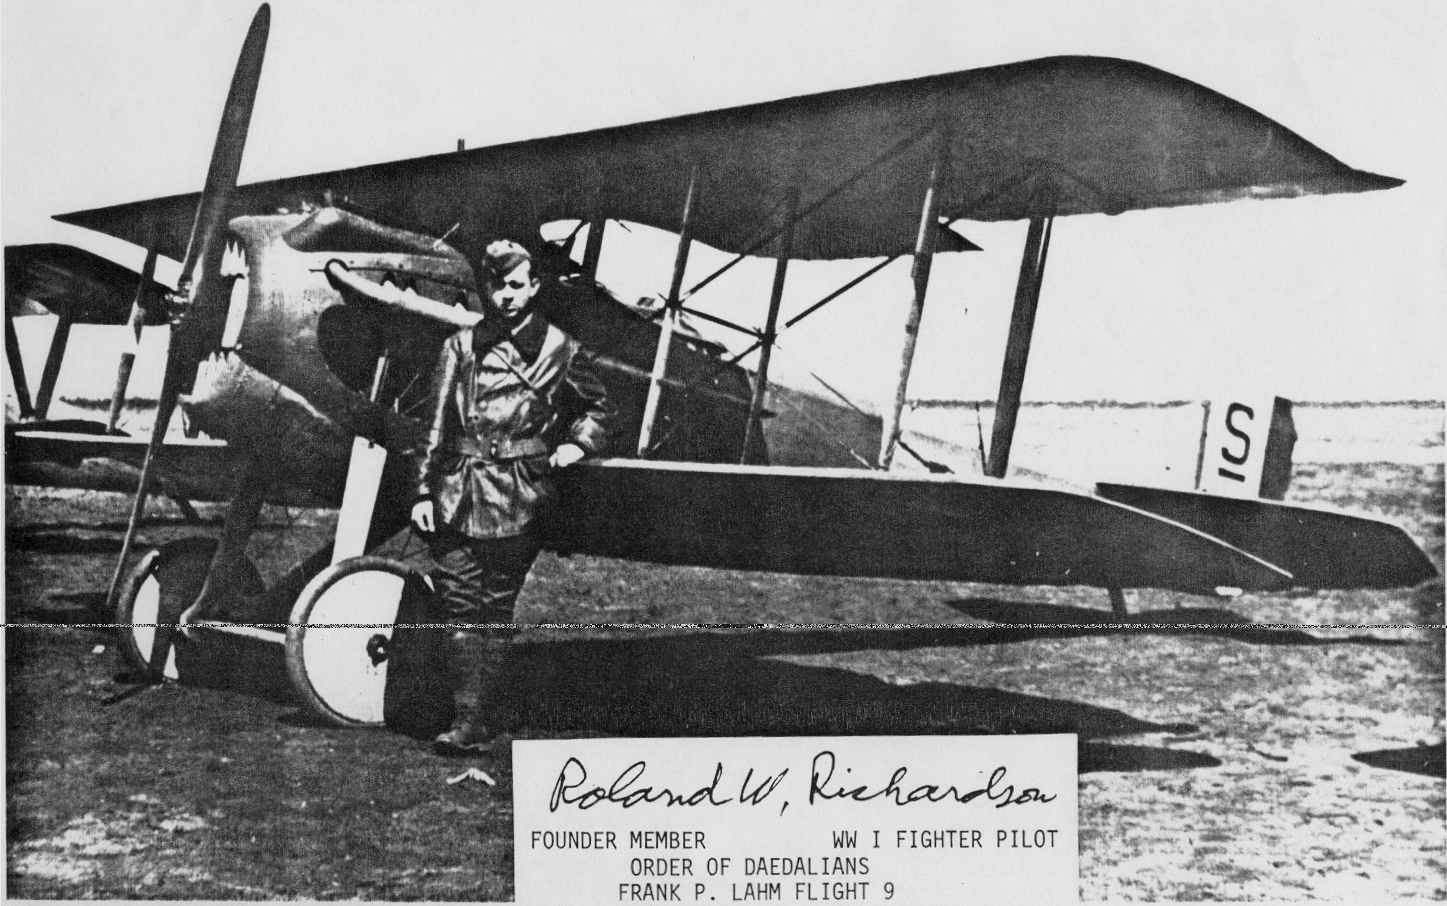
An American Pursuit Pilot in France 1917-1919. It's a book compiled from the diary and letters home of Roland Withenbury Richardson who flew with the 213th Squadron of the American Expeditionary Forces. With my penchant for the unique and unusual I thought this would be a good project to put together. There are just way too many models of Frank Luke and Eddie Rickenbacker. It's been done. I want to do something different.

This is going to be a 1/72 scale build. I just don't have room for anything larger. In fact I probably don't have room for this size either but I'm going to do it anyway.

So I have been gathering my research materials for a while now.
My first read through was a couple of years ago and it took FOREVER searching out decals. I thought I was going to have to freehand the squadron insignia.
 
 
But after much searching, finding nothing, searching again, finding nothing, and searching again, I finally found a shop online and ordered some decals from New Zeland. Whew! Well those decals were for two other pilots not mentioned in the book. Bummer. But I got the insignia!
 
There's not much out there on the internet photographically on this squadron but I looked up and read what I could, and I'm going to go by pictures in the book; like the one above, and the wings pallete plate below.
 
Now for some history:
Lt. Richardson was assigned to 213th Squadron and transferred to the front lines in the summer of 1918. On August 19th he received his new machine; a Spad XIII #15804. (One of the book references says #15304 so who knows - I guess it was difficult to read the handwriting in his diary.)Unfortunately he never says what number was assigned on the side, but he did  fly or ferry planes #24 & #26 so I think I may use one of those. (plus there is a #6 & a #4 in the decal set -- I only have to paint the #2s)
 
Two days after receiving his new machine and getting it all tuned up and fixed up he took it out on a test flight and upon landing the left wheel collapsed and it flipped over. He didn't have any injuries but there was a lot of damage to the plane. He says in his diary and a letter home to mother that his top wing had to be replaced and the only one available was an old style with the rounded tips. (Yay! Something unique and different to modify on the model!)
 
From this first impression of the Spad Lt. Richardson seemed to develop a skepticism toward these planes. He was always working on his and describing oil leaks, magnetos just falling apart, throttle rods coming loose in flight, etc. He was certain that the French were selling the US all of the rejects, rebuilt crashes, and planes built out of nothing but spare parts (Frankenstein) and keeping all of the factory fresh planes for themselves.
 
Stationed near Valcouleurs he was finally able to get his machine back in flying condition. On September 14, 1918, Lt. Richardson was on a patrol flight with Lt. Gaillard and Captain Charles Grey, flight commander. Together they were able to swoop down on a red Fokker monoplane (the specific model was never identified) and take it down. They split credit for the kill as they all got shots in (estimated 300 rounds fired) so this is the group I'm going to attempt to build.
 
I have found several pictures, examples of the #1 plane of Cpt. Grey.
The rest I'm just going to have to fake a little. I haven't found any good overhead photos of the group as far as any numbering position on the top wing and certainly can't find any of the bottoms. My intention was never to be absolutely historically accurate or to build a museum piece, I just want to be reasonably close.
 
So there it is. I'm committed to the build. Hopefully I'll be able to make time and keep it moving. I'm sure there are articles and whatnot in some periodicals  like Cross and Cockade but I didn't want to spend and eternity and a small fortune on research for this. But if there is anyone out there with more information, especially pictures, on the 213th Squadron please kindly point me in that direction.
 

Sunday, January 12, 2014

My first conversion

Well if you call modifying a model to anything other than straight out of the box then this qualifies.
This guy's from a Boyz box set I got about...oh...ten or so years ago...before the Black Reach box set came out when they revamped the models. This was my first attempt at modifying a model. I straightened out his arm as you can see, and I repositioned (added) some horns to his helmet.

You'll also notice these guys have shirt sleeves as opposed to the standard sleeveless orcs. I just always seem to be partial to having something different and unique. Also I had had this splinter camouflage scheme in mind and wanted more surface to paint it on so shirt sleeves = more surface.
Another with a repositioned horn on the helmet. He has a good dynamic pose like a charging rhino that I really like.
I really got into the modifications once I got going. I couldn't really get a good shot of it but here you can kind of see his pack of Marlboro reds strapped to the side of his helmet. I may try to get a better shot again later. And post pics of the whole unit.
One more close up shot of the first guy.

Well that's all I've got for this week. Let me know what you think.

I've spent most of this week taking pictures so I'll have a good stock of fillers to keep up posting, and doing some research on a project build I've been wanting to do for a long time. Plus mini-me had his 7th birthday this weekend and I've been building Call of Duty Mega Blocs instead of my models. I hope to get started on documenting the build project soon, we'll see.


Friday, January 3, 2014

This week's update: Russ from Hasslefree Miniatures
This is a good figure. In fact I think all of the Hasslefree minis are really great figures. They also have great customer service too by the way. If you haven't seen them you should check them out www.hfminis.co.uk

I think he turned out pretty good. Gosh I need a better camera. I think I used a satin clear coat on this one. It seems shinier ?? more shiny in the picture than in real life. I have a few figures in flat clear coat I'll shoot next time around and see how much a difference it makes.


The shield turned out nice. I kept an eye on the 5 day forecast graphics for quite a few days this spring trying to come up with a way to somewhat resemble a thunder cloud. I think it turned out good.

Well there he is. Now I need to use him in a game. Hope you liked it. Constructive comments are welcome.